Here is the video link showing all the procedure as video tutorial.
The drive shaft or axle in the front wheel drive vehicles is the most important part. The drive shaft is transferring the torque produce by the engine to the wheels from the transmission or gearbox. The drive shaft is the shaft which is keeping your vehicle running all the time you drive it. There is a complexity coming in the way while the front wheels are driven that is the front wheels are steering left and right according to the need and the same time the power or torque is transferred to the wheels from the transmission. for the purpose the drive shafts consisting of constant velocity joints CV joints are used. There are normally two CV joints each axle have. One close to the wheel is known is outer CV joint where as the other closed to the transmission is known as the inner CV joint. Both the CV joints are very much important for a vehicle to perform well. The outer CV joint is an arrangement of ball bearings whereas the inner joint is an arrangement of a needle bearing tripod bearings.
All ball bearings need lubrication to perform their function. They need constant lubrication all the time they do their work. There is no exception for the CV joint bearings! Grease is provided to CV joint bearings as lubrication. The grease is kept in the joints using CV joint boot rubbers. The joint boot rubber is covering the joints from outside and they keep the grease inside and provide the lubrication all the time to the bearings. The other purpose of the rubber boot is keeping the joint from dust, mud and dirt available on the road. The rubber boot is protecting the joints against the moisture and water entrance when you are driving in rainy weather on wet road.
CV joint rubber boots are very flexible and their special construction make them very much reliable but they are made of rubber and rubber have its definite life. There is a failure of the rubber occurring with passage of time. The rubber ruins and breakdown eventually. The time comes when the rubber boots torn out. That time they leak down grease from inside and dirt, dust, grime and moisture enters inside the joint. The joint breaks down due to lack of lubrication. Then in such a situation the car creates unwanted abnormal sounds. In such a case it needs expensive repair and drive axle replacement. Fortunately the rubbers are not very expensive and the replacement of the rubbers is also not very labor intense job. One can do such a job with little technical skills and a few general purpose tools. If those joint are forgotten and drive the vehicle with ruined rubber boots, the result would be an unreliable vehicle operation and driving failure resulting in expensive repair. The recommendation is to check the boot rubbers every oil change. Then attempt replacement of rubber boots if they broke down.
Here are the steps and procedure to attempt the rubber replacement job.
Open the central axle nut with appropriate size socket or box wrench. For removal of nut first unlock its locking tab with the help of a screw driver and a hammer. This nut is usually very much tight and needs much more force and torque to open. Use a leverage pipe if required.

Remove all four nuts and remove the wheel from the vehicle as shown below. The important step here is to lift the vehicle from ground and secure it on standing jacks. Personal safety is the prime.

Open the wheel hub mounting bolts using appropriate size socket and box wrench.

Pry off the axle spline from the wheel hub to make it free from the wheel.

Remove the axle from the wheel hub and keep it side.

crawl under the vehicle and pry off the axle inner spline from the transmission using a pry bar, or with the help of a big screw driver and hammer. It could be a little tough and tedious job some times as the axle is very firmly fixed inside the transmission.

Inspect both joints rubber boots and check them for tear down, break and cracks. As you can see our one had been broken down in two parts and that is inner CV joint. All parts must be washed and cleaned with regular gas or any lub. solvent of your choice. Make sure to remove all old lubrication and don't remain any splash from the old stuff.

Now you need a new CV joint rubber boot of the same size and make. You can procure them from parts stores. It is not a must to replace your one with the original dealership rubber but you can purchase third party replacement part for very low cost. They last a little less than original but they cost very less than original.

For the joint replacement it is important to remove the inner tripod bearings. To remove the tripod bearing, you should have to remove its snap ring using snap ring removal tool. After removing the snap ring pry off the tripod bearing from axle spline by pulling it off or sometimes a little hammering would be required to bring off the tripod bearings. Then remove the CV joint boot rubber locking rings (metal strip) from both ends to remove the rubber boot from the axle.

After removing the old rubber boot from the axle, you should have to place new rubber boot on the axle. Then you should place the rubber boot locking ring on the small end of the rubber boot.

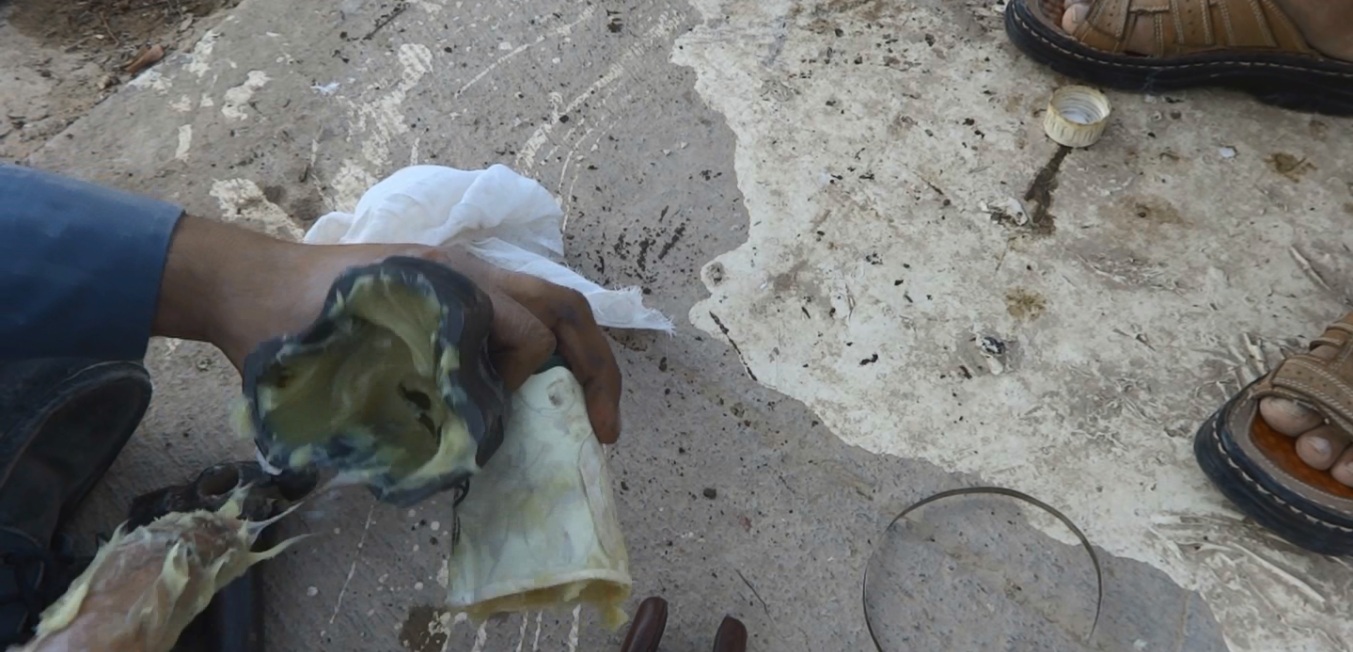
Well lubricate the inner of the rubber boot. Note that this will be done for both outer and inner rubber boots if you are maintaining both. You should provide just adequate quantity of grease in boot to maintain lubrication. It should not be too much so that it will puncture the boot and it should not be less enough so that the bearings will become lubrication starved. For lubrication you can use Lithium based grease. They are available in different colors like golden yellow, gray, black, green or sometimes red. Any general purpose Lithium based grease could do the purpose.

Install the cleaned and washed tripod bearing back. You should lubricated inside the needles bearing as well to do it properly lubricated. For bearing installation, make a few light taps with your light weight hammer to fix it properly in its position on spline.

After fixing the tripod bearing you should install back the snap ring and make it a little tapped with hammer to fix it and secure it. Use the snap ring tool to fix it in place.
Provide a little more lubrication to the tripod bearing installed to make sure perfect lubrication to the joint.

Supply enough lubrication in the cavity of the wheel side half of the CV joint to ensure enough lubrication in the unit.
Connect both sides of the CV joint to complete its assembly. Clean any residual lubrication which may pop off of the joint during fixation. Then place and secure the locking ring on the joint. it will complete the whole axle assembly.

Complete the axle and clean any residual grease from the axle and joint. Provide a little grease lubrication to the spline part to ensure keeping it from rusting. It will ease your disassembly for future time. You can provide copper anti cease if you are too specific and much more disciplined! But keep in mind that the general purpose grease could do very well.

Install back the axle or drive shaft in the transmission and provide a few taps with average size hammer to ensure proper fixation of the axle in the transmission. In the transmission the axle is tightly secured. Then install the axle back in the wheel hub spline and fix back all bolts and nuts to ensure proper assembly of the whole system.

After fixing everything back you should secure the axle nut back and lock its tab using a screw driver and a hammer. This will prevent the nut from loosening and falling down during driving of the vehicle. Also fill in the transmission fluid as you will loose some quantity of transmission fluid in the process. This repair will be successful if you do it carefully. Also it will pass a few years of service when you successfully do it. It is a little labor intense job but if you will do it yourself you will do it better than a professional mechanic hence quality of job will increase. The reason is you will have plenty of time to do the job and also you will do it with special care and attention as it will be your own job. Good luck with your repair and keep on studying my other blogs on car repairs. Also you may watch my youtube videos as they will give more than enough information on numerous topics.
Here is another video on my youtube channel covering more details on the subject:
Here is another video on my youtube channel covering more details on the subject: